How to Create a Link to a Document in Joomla?

Creating links to documents in Joomla is a straightforward process. In this guide, we'll walk you through the steps to link documents using different methods available in Joomla.
Step 1: Prepare Your Document
Before you can link a document, you need to ensure it's uploaded to your Joomla site. You can do this via the Joomla Media Manager or by directly uploading it to your server via FTP.

Using Joomla Media Manager:
- Navigate to Media Manager:
- Go to Content > Media.
- Create a New Folder (Optional):
- If desired, create a new folder named
docsto organize your documents.
- If desired, create a new folder named
- Upload Your Document:
- Click on Upload.
- Select your document file (e.g., PDF, DOCX) and upload it.
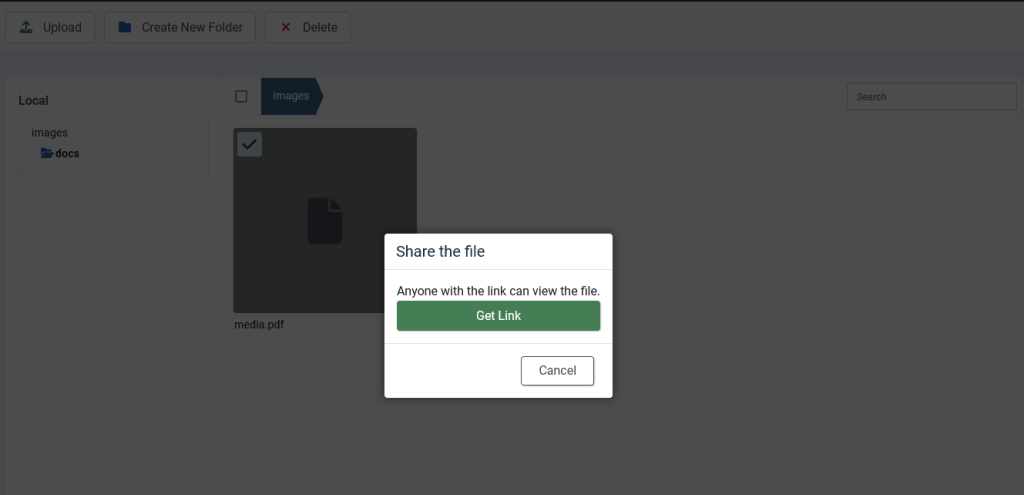
- Get the Document Link:
- Once the file is uploaded, click the three dots in the top corner of the file.
- Select the Get Link option. A popup will appear with a Get Link button.
- Click this button to copy the link to your clipboard for later use.
Troubleshooting Upload Issues
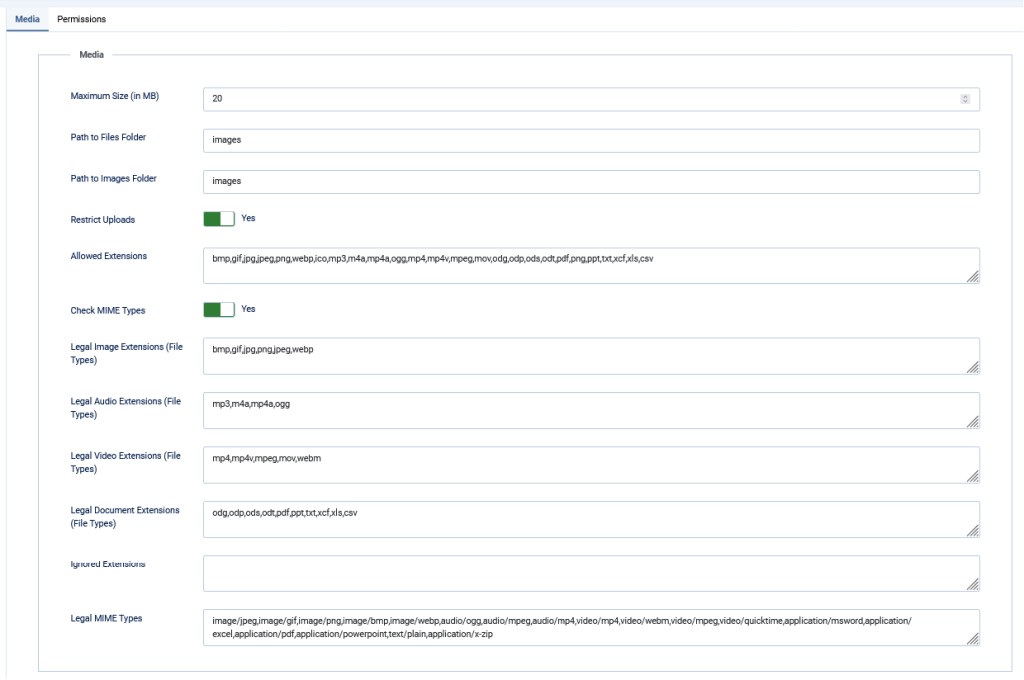
If you encounter the error "Unable to upload file or This file type is not supported.," you can address this issue by adjusting the Media Manager options. Here's how to do it:
- Go to the options of the Media Manager and check the configurations as described in the troubleshooting section of this guide.

- Maximum Size (in MB):
- Description: This setting specifies the maximum size of a file that can be uploaded via the Media Manager.
- Current Setting: 10 MB.
- Usage: Files larger than this size will be rejected during upload. Adjust this value based on your needs and server limitations.
- Path to Files Folder:
- Description: This sets the directory path where non-image files (like documents, audio, video) are stored.
- Current Setting:
images. - Usage: You can change this path if you prefer to organize your files in a different directory within your Joomla installation.
- Path to Images Folder:
- Description: This sets the directory path where image files are stored.
- Current Setting:
images. - Usage: Similar to the files folder, you can change this to organize your images in a different directory.
- Allowed Extensions:
- Description: This is a comma-separated list of file extensions that are allowed to be uploaded via the Media Manager.
- Current Setting:
bmp,gif,jpg,jpeg,png,webp,ico,mp3,m4a,mp4a ogg,mp4,mp4v,mpeg,mov,odg,odp,ods,odt,pdf,png,ppt,txt,xcf,xls,csv.- Usage: Ensure that all required file types for your website are included in this list to prevent upload issues.
- Check MIME Types:
- Description: This toggle ensures that the file's MIME type is checked against the allowed MIME types list.
- Current Setting: Enabled (Yes).
- Usage: This adds an extra layer of security to verify the file type being uploaded matches its MIME type.
- Legal Image Extensions (File Types):
- Description: This is a list of image file extensions that are legally allowed to be uploaded.
- Current Setting:
bmp,gif,jpg,png,jpeg,webp. - Usage: Defines which image formats are permissible for upload.
- Legal Audio Extensions (File Types):
- Description: This is a list of audio file extensions that are legally allowed to be uploaded.
- Current Setting:
mp3,m4a,mp4a,ogg. - Usage: Defines which audio formats are permissible for upload.
- Legal Video Extensions (File Types):
- Description: This is a list of video file extensions that are legally allowed to be uploaded.
- Current Setting:
mp4,mp4v,mpeg,mov,webm. - Usage: Defines which video formats are permissible for upload.
- Legal Document Extensions (File Types):
- Description: This is a list of document file extensions that are legally allowed to be uploaded.
- Current Setting:
odg,odp,ods,odt,pdf,ppt,txt,xcf,xls,csv. - Usage: Defines which document formats are permissible for upload.
- Ignored Extensions:
- Description: This is a list of file extensions that should be ignored during the upload process.
- Current Setting: Empty.
- Usage: Use this to specify any file types that should be excluded from upload considerations.
- Legal MIME Types:
- Description: This is a list of MIME types that are legally allowed to be uploaded.
- Current Setting: A comprehensive list of MIME types including
image/jpeg,image/gif,image/png,image/bmp,image/webp,audio/ogg,audio/mpeg,video/mp4,application/msword,application/excel, etc. - Usage: This ensures that only files with these MIME types can be uploaded, adding a layer of security to prevent malicious uploads.
These settings collectively manage the types of files that can be uploaded to your Joomla site, their sizes, and their storage locations. Adjusting these configurations can help resolve common upload issues and ensure your site operates smoothly.
Alternately you can upload file through FTP if you have FTP access.
Using FTP:
- Connect to your website's server using an FTP client.
- Upload your document to a directory within your Joomla installation (e.g.,
images/docs).
Step 2: Create a Menu Item or Article
To create a link to your document, you can either insert it into an article or create a direct menu link.
Inserting a Link in an Article
- Create or Edit an Article:
- Go to Content > Articles > Add New Article (or open an existing article).
- In the editor, type the text you want to link (e.g., "Download PDF").
- Link the Text to Your Document:
- Highlight the text you want to link.
- Click on the Insert/Edit Link icon (usually represented by a chain link).
- In the URL field, enter the path to your document (e.g.,
images/docs/yourfile.pdf). - Set the Target to
_blankif you want the document to open in a new tab. - Click Insert.
Creating a Direct Menu Link
- Create a New Menu Item:
- Navigate to Menus > [Your Menu] > Add New Menu Item.
- In the Menu Item Type field, click on External URL.
- Link to Your Document:
- In the Link field, enter the full URL of your document (e.g.,
http://yourwebsite.com/images/docs/yourfile.pdf). - Set other parameters like Menu Title and Target Window.
- Click Save & Close.
- In the Link field, enter the full URL of your document (e.g.,
Best Practices for Linking Documents
- Keep URLs Short and Descriptive: Ensure your document URLs are concise and meaningful to improve readability and SEO.
- Use Clear Link Text: The text for your links should clearly describe the document. For example, use "Download Annual Report" instead of "Click Here".
- Organize Your Documents: Use folders and subfolders to keep your documents organized, making them easier to manage.
Conclusion
Linking documents in Joomla is a simple yet powerful way to provide resources to your site visitors. Whether you’re inserting links into articles or creating direct menu links, Joomla offers flexible options to meet your needs. By following the steps outlined above, you can enhance your site’s functionality and provide valuable content to your audience.


